Reclaimed Wood Entryway Rack - Pinterest Live!
/Learn how to make a Reclaimed Wood Entryway Rack from the Pinterest Live! event event held last night at Suite Pieces in Huntington Station, NY.
Read MoreLearn how to make a Reclaimed Wood Entryway Rack from the Pinterest Live! event event held last night at Suite Pieces in Huntington Station, NY.
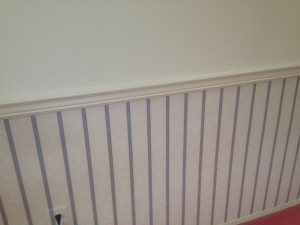
Read MoreCurrently we're renting. And with our rental comes 90's wallpaper from your grandmother's dream house. It's nothing pretty to say the least and it's incredible I've lived here this long without getting rid of it. Must be because the thought of taking down 4 large rooms of wallpaper by myself makes me want to run far far away. But like many other renters, I got fed up and the wallpaper had to go. A DIY Chalkboard wall was my next idea! Our house has a total of 4 rooms with wallpaper - living room, kitchen, master bedroom and hallway. I figured I'd start with the living room and then go from there. If you've ever removed wallpaper before you'd understand why after the living room, the rest of the wallpaper is staying . Our living room has a chair-rail throughout with wallpaper below it (see photo below). The wall by the front door is floor to ceiling with the same wallpaper. It's faux wainscoting. bleh. I love wainscoting, but not faux wainscoting.
 Who doesn't like chalkboard paint?! It's like the new sponge paint! I did see on Pinterest one woman paint her refrigerator with chalkboard paint. I thought about doing that but then came to the conclusion that that project may be more than I can handle. On top of that, there's no going back once it's done - and it's not our fridge. So a wall it is. But our wall is huge. I searched all over the internet for validation that it would be OK for 2 adults (with no kids) to have a large wall in their home covered in chalkboard paint. I found nada. So I asked my fiance, he said he didn't care what I did with the walls, "so that settles it, wallpaper is coming down and chalkboard paint is going up!"
It took no longer than any other regular paint to finish the wall and didn't cost much more or less either. What I found was that it typically comes in quart size paint cans and a few different colors. I went with black because I figured green would look more like poop on my walls. I found it at Lowes for $15 and Home Depot for $9.99 - bought 2 cans at Home Depot. My entire wall with 2 coats of paint (plus 2 coats of regular paint primer) only used about 1 and 1/4 cans of chalkboard paint. Pretty darn good if I may say so myself.
Once you finish the wall, let it dry for 1-2 days. Then you're going to have to condition the wall by rubbing chalk all over the wall and then rubbing it off with some paper towels or a chalkboard eraser. Don't use water during this step. After that you have to wait at least 3 days before you can write on the wall and another 7 days before you can wash it with a damp towel. Once your wall is done it's awesome! Get creative with your new chalkboard wall - write inspirational quotes or draw pieces of furniture. You get the point. One thing I wish I had done was paint the wall with a coat of magnetic paint before applying the chalkboard paint that way the wall would be magnetic as well. Such is life - I'm super happy with my chalkboard wall the way it is.
I decided to write some "happy birthday" signs on the wall for my 30th birthday, especially since we were hosting a party for me at our house.
 During the party I left out the chalk and my friends all wrote nice comments and birthday wishes for me. It's really a lot of fun and was the biggest hit at the party.
  If you're wondering whether or not adults can have big chalkboard walls - the answer is yes. You don't have to paint an entire wall, you can choose a small portion or frame a square in the kitchen for the perfect place to leave notes for your loved ones. Any way you do it will be a conversation piece and something you can enjoy together. Turns out my sister painted one of the walls in my nephews bedroom with chalkboard paint, so it's great for kids too. Have fun with it!
 I've been feeling crafty lately, so I decided to make something to celebrate the holiday season. My budget is small, I mean tiny. I'd prefer to spend as little money as possible on whatever it is I make. Then I remembered back to when I was a kid when I would craft all the time. There was this wreath that I made, it was so simple yet so beautiful. And it was made out of your everyday sandwich baggies. I wanted to make that wreath again.
- 1 box 150 (or more) sandwich baggies - 1 wire hanger - some ribbon (at least 3" inches thick)
1. Start by shaping your hanger in to a circle. Some find it easier to use metal pliers for this, however, I just used my hands. Don't worry if it's not perfectly round, you won't be able to tell when it's complete.
2. Then begin tying the baggies on to the wire one bag at a time. Try to tie them in a knot in the center of the bag so that you have equal parts baggie on each side of the knot.
Finally you'll end up with a full hanger. I used all 150 bags in the box and could have used a handful more. If you have any empty space left on the hanger simply slide down some of the baggies to fill the space. Remember to fluff the baggies as best you can to make your wreath appear as full as possible.
You can decorate your wreath however you like. If your theme is Christmas, try attaching some Christmas tree ornaments or holiday flowers to the wreath using some thin wire. I chose to go with a large bow and because my home is of mixed religion (I'm Jewish and my fiance is Catholic) I decided to go with sparkly silver ribbon for more of a winter theme. For the bow, I followed a tutorial I found on Pinterest called How to Make a Perfect Bow by OnSuttonPlace.com. It was very easy to follow and my bow came out well.
I tied the bow on to the wreath using dental floss. And I bent the top part of the hanger (the part you hang over your closet rail) to fit snugly over my door knocker. Tip: do not use glittery ribbon. I have glitter everywhere. And I mean everywhere. No matter how hard I tried to contain it, the stuff just multiplies and travels like no other.
The total cost of this wreath, which I think turned out very pretty, was about $4. The wire hanger I pulled out of my closet, the box of baggies was $1 at my local grocery store, and the roll of ribbon was $9.99 on sale 70% off, which ended up costing $2.99 at Michael's. It took me about an hour and a half total to make this wreath (60 minutes to make the wreath and 30 minutes to make the bow and successfully hang it on my door).
It looks so cute on our door if I may so so myself.
What kind of creative ways have you used basic kitchen items? Please share your ideas, I love to hear them!
Helping families achieve their best bodies one bite at a time.
Privacy Policy Terms and Conditions Contact Shoshana
Copyright 2023 © Nutrition by Shoshana. All Rights Reserved.