Chewy Berry Granola Bars

Every year the month of February rolls around and the first thing that comes to mind is Valentine's Day. Store fronts emit a reddish-pinkish hue and women all over the country anticipate what that special day might bring for her. This year I wanted to make a healthy treat for my fiance to show him my appreciation, so I came up with Berry Love Healthy Granola Bars. I've made many different kinds of granola bars in the past. For these bars, I wanted to use dried fruits that are red to stay with the theme, so I chose cherries, cranberries and strawberries. Then I went with yogurt covered raisins to throw in the color white. What I didn't anticipate was the sweet flavors of this combination to become a flavor explosion in your mouth. I give Berry Love Healthy Granola Bars an A+ and a golden star sticker seal of approval!

I thought about adding red food coloring to make them red in color. Would that have been strange? eh, maybe not.

How are you celebrating Valentine's Day this year?

granola-bars.jpg

Chewy Berry Granola Bars

makes 8 servings - prep time: 10 minutes - cook time: 30 min

Ingredients:

  • 1 1/4 cup dry oats
  • 1/4 cup flax meal
  • 1/4 cup each dried cranberries, dried strawberries, dried cherries and yogurt raisins
  • 1/3 cup each of raw almonds, cashews and macadamia nuts (I used unsalted and crushed macadamia nuts)
  • 1/2 cup brown rice syrup

Instructions:

  1. Preheat oven to 325 degrees F. Line an 8 x 8" baking pan with parchment paper and spray lightly with cooking spray. Set aside.
  2. In a large bowl, combine oats, nuts and dried fruit. Pour syrup in microwave safe bowl, heat for 15-20 seconds, then pour over dry ingredients. Mix well with a large spoon.
  3. Pour batter in to baking pan. Press down firmly with wet paper towel or oiled hand.
  4. Bake the bars for 25-30 minutes for a chewy bar. Bake for 35-40 minutes for a crunchy bar. When the bars come out of the oven, press them again using a wet paper towel. Allow the bars to cool completely in the pan before slicing. The bars will firm up as they cool. Remove the bars by pulling them out using the excess parchment paper. Place on cutting board and slice in to 8 bars. Store in air tight container or wrap them individually in saran wrap for a quick gran-n-go snack.

    Kiwi Coconut Protein Smoothie

    Hurricane Sandy has really put a damper on reality. Even the grocery stores are lined with barren shelves and day old bread. Sometimes you can find awesome deals though. Since the gas shortage has no end in sight, I decided to spend my time at home over the weekend. Opted for a noon run before lounging on the couch for the rest of the afternoon. Before that I did however use what is left in my gas tank to drive to the grocery store. Good thing it's only about 3 miles from my house. Since I knew I was going to go for a run soon as I got home from the store, I thought I'd take the opportunity [and time] to make a new post-workout protein shake. And 3 for $1 Kiwis sounded like the winning ingredient! What pairs well with Kiwis you ask? Strawberries of course. But I didn't really want to buy a whole carton of strawberries to only use 4. That's when it hit me - coconut! I've got coconut milk and shredded coconut at home! Sounds amazing! And amazing it was!

    Perfect for a post-run meal - this smoothie is packed with lean protein and carbs our bodies need to replenish energy stores. On top of that, the tart and sweet flavor of the Kiwi was the perfect compliment to the smooth creaminess of the coconut. And the fact that it was green with little black dots made it oh-so-fun! Ok enough over-enthusiasm.  Here's the recipe:

    Question: Do you like Kiwi? What's your favorite way to enjoy this sweet green fruit?

    Kiwi Coconut Protein Smoothie

    Prep time: 7-10 minutes - makes 1 serving

    Ingredients:

    2 kiwi, sliced and skin removed 1/2 cup unsweetened coconut milk 1 tablespoon vanilla sugar-free/fat-free instant pudding mix (powder) 1 scoop vanilla or unflavored whey protein 2 tablespoons shredded coconut ice

    Directions:

    Put all ingredients in a blender including 1 tablespoon shredded coconut. Blend until smooth. You may need more or less ice for thicker consistency of smoothie. Top with the rest of the shredded coconut and enjoy!

    Nutrition Facts Per Serving Calories 358, Calories from fat 102, Total Fat 12g, Sat. fat 9g, Trans fat 0g, Cholesterol 0mg, Sodium 213mg, Total Carbohydrate 37g, Dietary Fiber 6g, Sugars 26g, Protein 30g, Iron 1.4mg Source: Nutritiondata.com

    Not Your Mom's Beef Brisket

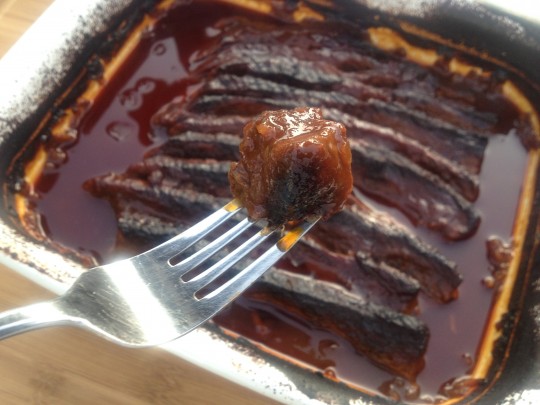
    Rich and I moved in together just a little over 4 months ago when he returned home from Air Force training. Before that I had my own place, and he had his. We’d try to spend as much time with each other as possible and considering that my apartment was a super small studio, much of that time was spent at Rich’s house. He’d cook me dinner, or I’d stop over for lunch during the week. It wasn’t until Rich and I moved in together that I finally had the chance to cook for him. I know, hard to believe considering I cooked for myself a few times a week when I lived alone. But for some reason, it just never happened. The first time I cooked for Rich I made him a staple in any Jewish holiday meal – Beef Brisket and potato Kugel (pronounced koo-gle). Like any other Jewish girl, my mom has the best beef brisket recipe around. But since I’m a bit neurotic when it comes to healthy eating, I decided to cut down the calories and make her brisket my own way. Rich loved it and so did I!

    Now, I cook Brisket as often as I can. In fact, Saturday night was the perfect night to cook dinner for Rich because he had to be at work bright and early at the Air Force base for a drill weekend. This time I made a top secret Quinoa recipe as the side dish.

    You'll have to snag a copy of the January 2013 issue of Oxygen magazine for that one. But for now, try my Beef Brisket, it falls apart in the pot and melts in your mouth.

    What's your favorite dish to recreate from your childhood? Do you cut the calories or make it like mom?

    Not Your Mom's Beef Brisket

    Prep time: 10 minutes - Cook time: 2.5 to 3 hours - Makes 4 Tender Servings

    Ingredients:

    1:1:1 ratio of all ingredients - 1-2 packets of French Onion Mix 1 cup reduced sugar Ketchup (or regular) 1 cup diet Ginger Ale 1 Brisket of Beef

    Note: the size Brisket you purchase will determine the amount of ingredients you'll need. The sauce should cover the brisket in the roasting pan. So if you have a large Brisket you may need to double all ingredients. Look for top cut or single cut brisket that has very little fat and marbling.

    Directions:

    Preheat oven to 350 degrees Fahrenheit. In a large mixing bowl combine wet and dry ingredients. Whisk together. Place brisket in large roasting dish, pour sauce over brisket making sure the sauce covers the entire piece of meat. Bake at 350 degrees, covered for 25 minutes.

    Remove brisket from pan and place on grooved cutting board (to catch the juices). Slice meat thinly against the grain then place back in the pan making sure all slices of beef are surrounded by the sauce. Cover and put back in the oven. Cook for 1 hour covered.

    After an hour has passed, remove the cover from the pan and cook for another hour. Check to see if the meat is tender; if the meat falls apart easily then it's done. If the brisket is not tender enough, cook it longer.

    Note: brisket is best if it's slow cooked. And if you're short on time you can easily begin the cooking process the night before. After the first hour and a half of cooking, take out the brisket, let it cool; cover it and place in the fridge. The following night heat the oven to 325 or 350 and continue cooking for the final hour. If dinner is not until later in the evening, lower the heat to 250 and leave the brisket in the oven until you're ready to eat.

    Nutrition Facts Per Serving Calories 234, Calories from fat 49, Total Fat 5g, Sat. fat 2g, Trans fat 0g, Cholesterol 27mg, Sodium 2916mg, Total Carbohydrate 18g, Dietary Fiber 3g, Sugars 9g, Protein 22g, Iron 1.9mg Source: nutritiondata.com

    Paleo Banana Nut Protein Bars

    Sometimes you just want a nostalgic treat without the calories.  When I was a kid my mother made the most amazing Banana Nut Bread that I'll never forget.  There's nothing like slicing a piece of fresh Banana Bread straight out of the oven and topping it with creamy Vanilla Bean Ice Cream.  Nowadays tasty treats like the ones my mom made as a kid are found less than occasionally in my house.  Rich and I are both super nutty (you see what I did there, haha) about nutrition and eat the same clean foods every single day.

    But after seeing a recipe online for Banana Nut Bread, I was inspired.  Why not make a healthy version that Rich and I can eat without feeling guilty.  Enter Paleo Banana Nut Protein Bars.

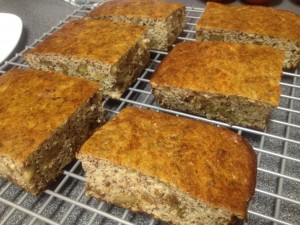
    These things were awesome.  Of course they weren't as moist as Mom's original, but they were just as tasty.  We kept them in the fridge for a quick snack.  I kept finding Rich red-handed grabbing a taste with Trader Joe's Almond Butter.  What makes these even better is that they're grain free (which then makes them Gluten Free) and sugar free!

    What's your favorite thing to top on your banana bread?  

    Paleo Banana Nut Protein Bars

    Prep time: 15 min. - Cook time: 20 minutes - Makes 6 Servings

    Ingredients:

    • 1 mashed banana
    • 2 egg whites
    • 2 whole eggs
    • 1/4 cup flax meal
    • 1 cup chopped walnuts
    • 3 scoops vanilla whey protein powder of your choice
    • 1/4 tsp salt
    • 2 tbsp. light coconut milk (I used Trader Joe's)
    • 1 tbsp. vanilla extract

    Directions:

    1. Preheat your oven to 375 degrees.
    2. In a large bowl, combine wet ingredients (banana, eggs, egg whites, coconut milk and vanilla extract) until smooth.
    3. Add remaining ingredients to the wet mixture and combine well.
    4. Pour batter in to a greased or lined baking pan (I used a 9 x 11 cake pan). Spread batter with spatula making sure it's distributed evenly in the pan.
    5. Bake for ~20 minutes or until a knife comes out clean from the center.
    6. Cut in to 6 squares and let cool on rack. Wrap individually for a quick grab-n-go snack. Best stored in the fridge.
     

    Nutrition Information for Paleo Banana Nut Protein Bars via nutritiondata.com