Coconut Protein Bites

A few months ago I was working on a handful of recipes for one of my Oxygen magazine articles. It was a recovery themed article so my recipes had to include ingredients that would work well for a pre- and post-workout snack. One of the ingredients I wanted to include was Avocado. Maybe it was bold thinking but I thought I could come up with a lean protein bar with the creamy fruit. Every attempt was a fail. That's where Coconut Avocado Protein Bites come in. Note: Oxygen decided not to use this recipe in the article so you get to see them here on my blog instead!

These little snacks are found all over the internet and various blogs I frequent. So I thought, "why not give them a try." You can almost make protein bites with any flavor you'd like and they will still turn out tasting like candy. I know it's hard to believe, but my Coconut Avocado Protein Bites taste like candy too! If you've tried my Double Chocolate Mint Protein Bites then you'd know just how decadent these little balls of goodness can truly be.

Just last week we were snowed in with 35 inches of snow from our dear friend Nemo (or the blizzard of 2013 for those not in-the-know). That's right - 35 inches! I sure wish I had made an entire batch of these bites for our weekend indoors. On the bright side, we spent 2 hours on Saturday shoveling snow and 3 hours on Sunday shoveling some more snow. Not that it really mattered, our street had not been plowed until late Sunday evening so it's not like we could move our cars if we wanted to. Nevertheless we still shoveled and shoveled and shoveled to make sure our cars were clear of snow and we could move them the first chance we got. Whatever. That's what we get for living in NY, right? If you check Google and look up how many calories you can burn shoveling snow you'll see that our efforts were totally worth it! Apparently shoveling snow burns about 300 calories per hour!

Here's Rich looking pretty proud of his our pile of snow. It got about another foot taller, this photo was taken I believe on Saturday.

Rich Unhappy Shoveling

And here is Rich looking pretty pissed off that it is now Sunday afternoon and plows have yet to show up. Behind Rich is our street, full of snow. In front of Rich is his car all clear of snow.

This is me feeling pretty sweaty after shoveling for a while in the sun on Sunday. Good thing the sunglasses are hiding my makeup-less face!

And after we shoveled snow on Sunday, we decided to do a workout indoors - give it a try, it was a real lung burner!

For time: 20 hand-release pushups 40 walking lunges holding 25# weight overhead (I used my 26# kettlebell cuz that's all I had) 80 double unders 80 situps 40 jumping squats 20 hand-release pushups

Not sure how long it took me to complete this workout, maybe 10 minutes at the most.

What other ingredients would you like to try in a protein bite or protein bar?

coconut-protein-bites.jpg

Coconut Protein Bites

makes 4 servings - prep time: 40 minutes - cook time: none

Ingredients:

  • ¾ C Oat Flour (if you can’t find oat flour, you can grind rolled oats in your blender or food processor)
  • ¾ C Vanilla protein powder
  • ¼ C Avocado mashed
  • ¼ C unsweetened shredded coconut
  • ½ tsp. vanilla extract
  • ¼ C water
  • dash of salt
  • 1 tsp. powdered Stevia
  • 1 tbsp. Carob Chips
  • ¼ C Flax Meal (or ground flax seeds)

Instructions:

  1. In a medium size bowl, combine oat flour, protein powder, flax meal, salt, stevia and coconut.
  2. Add mashed avocado, vanilla extract, and carob chips to the dry mix.
  3. Slowly add water while stirring. Batter should be slightly dry and not too sticky. If you add too much water batter will be sticky and you’ll have to add more flour and/or protein powder to balance it out.
  4. Scoop about 1 tbsp. of batter in to your hand and roll in to a ball. Optional – roll bites in shredded coconut before allowing to set.
  5. Place bites on a parchment lined tray or plate. Let set in fridge for 30 minutes.

Notes:

Be careful when adding water to this recipe. If you add too much water too fast you will have a very sticky ball to deal with. Add water slowly.

Nutrition per serving: Calories: 227, Total Fats: 8 g, Saturated Fat: 4 g, Trans Fat: 0 g, Cholesterol: 0 mg, Sodium: 90 mg, Total Carbohydrates: 19 g, Dietary Fiber: 6 g, Sugars: 4 g, Protein: 22 g, Iron: 1.4 mg

Chewy Berry Granola Bars

Every year the month of February rolls around and the first thing that comes to mind is Valentine's Day. Store fronts emit a reddish-pinkish hue and women all over the country anticipate what that special day might bring for her. This year I wanted to make a healthy treat for my fiance to show him my appreciation, so I came up with Berry Love Healthy Granola Bars. I've made many different kinds of granola bars in the past. For these bars, I wanted to use dried fruits that are red to stay with the theme, so I chose cherries, cranberries and strawberries. Then I went with yogurt covered raisins to throw in the color white. What I didn't anticipate was the sweet flavors of this combination to become a flavor explosion in your mouth. I give Berry Love Healthy Granola Bars an A+ and a golden star sticker seal of approval!

I thought about adding red food coloring to make them red in color. Would that have been strange? eh, maybe not.

How are you celebrating Valentine's Day this year?

granola-bars.jpg

Chewy Berry Granola Bars

makes 8 servings - prep time: 10 minutes - cook time: 30 min

Ingredients:

  • 1 1/4 cup dry oats
  • 1/4 cup flax meal
  • 1/4 cup each dried cranberries, dried strawberries, dried cherries and yogurt raisins
  • 1/3 cup each of raw almonds, cashews and macadamia nuts (I used unsalted and crushed macadamia nuts)
  • 1/2 cup brown rice syrup

Instructions:

  1. Preheat oven to 325 degrees F. Line an 8 x 8" baking pan with parchment paper and spray lightly with cooking spray. Set aside.
  2. In a large bowl, combine oats, nuts and dried fruit. Pour syrup in microwave safe bowl, heat for 15-20 seconds, then pour over dry ingredients. Mix well with a large spoon.
  3. Pour batter in to baking pan. Press down firmly with wet paper towel or oiled hand.
  4. Bake the bars for 25-30 minutes for a chewy bar. Bake for 35-40 minutes for a crunchy bar. When the bars come out of the oven, press them again using a wet paper towel. Allow the bars to cool completely in the pan before slicing. The bars will firm up as they cool. Remove the bars by pulling them out using the excess parchment paper. Place on cutting board and slice in to 8 bars. Store in air tight container or wrap them individually in saran wrap for a quick gran-n-go snack.

    Crock Pot Soy Ginger Chicken Meatballs

    You know those pizzas that are topped with anything but Italian components? You know what I'm talking about, barbeque pizza, Greek pizza, whatever, you get the point. Well, I'm not a big fan of pizza that isn't made with red sauce, cheese and other Italian toppings. Meatballs on the other hand, I'm totally interested in trying something new. Introduce Soy Ginger Chicken Meatballs - in the Crock Pot no less. You'd think that because I used ground chicken breast they'd be dry and crumbly, but in fact these meatballs were quite the opposite. They are soft, moist and filled with Asian flavors. You can serve them as an appetizer at a party or as an entree on top of brown or white rice. These versatile little meatballs are high in lean protein, and low in carbs and fat. If you don't have a crock pot you can easily cook them stove top for 2-3 hours.

    Soy Ginger Chicken Meatballs

    makes 4=6 servings - prep time: 35 minutes - cook time: 6 hrs

    Ingredients:

    • 1 pound uncooked ground chicken breast (can use turkey breast)
    • 2 tablespoons Olive Oil
    • 8 cloves garlic, minced
    • 1 tablespoon fresh grated ginger
    • 2 egg whites
    • 1/4 cup rolled dry oats
    • 1/2 cup finely chopped red sweet pepper (1 small)
    • 4 tablespoons low sodium Soy sauce
    • 2 teaspoons sesame oil
    • 1/2 cup chopped yellow onion (1 medium)
    • 2 cups reduced sodium chicken broth
    • 2 tablespoons rice vinegar
    • 1 tablespoon honey or brown rice syrup
    • 1 1/2 cups cooked brown rice (optional)

    Instructions:

    1. In a large skillet heat half of the olive oil over medium heat. Add yellow onions and cook until tender and translucent. Then add half the garlic and ginger, cook for another 30 seconds. Remove from heat and set aside.
    2. In a large bowl combine egg whites, oats, sweet pepper, half the cooked onion mixture, 1 tablespoon of soy sauce and 1 teaspoon of the sesame oil. Add ground chicken and mix well. Form chicken mixture in to small meatballs and cook in skillet (using remaining olive oil) on medium-high heat until browned, turning occasionally.
    3. Place chicken meatballs in bottom of crock pot. Try not to place them on top of each other.
    4. Add remaining cooked onion mixture to crock pot.
    5. In a small bowl, mix together the remaining soy sauce, chicken broth, rice vinegar, sesame oil and honey. Pour into crock pot.
    6. Set crock pot to low heat and cook for 5-6 hours.

    Notes:

    Serve as an appetizer or on top of brown or white rice.

    Chicken Fiesta Soup

    Chicken Fiesta Soup
    Chicken Fiesta Soup

    It's winter so why not warm up with a spicy soup like Chicken Fiesta Soup?! I found this recipe in the Crock Pot Original Slow Cooker Recipe Collection and decided to alter it slightly to meet my families needs. It turned out to be a delicious Mexican style meal that was not only healthy but versatile as well. The actual recipe called for only 4 breasts of chicken, but I opted for 6 considering my Crock Pot is large enough and Rich and I love a lot of chicken in our meals. Then the versatility falls in where you can top the soup with whatever feels right to you. The recipe called for crushed tostada shells and sharp cheddar cheese. But I opted for a lite Mexican blend of cheese from Trader Joes while Rich went with adding some freshly made Quinoa that I whipped up for him. And because ours was so filled with chicken, it'd be great to make Quesadillas or Enchiladas with!

    We've got soup for days and have been eating it for lunch ever since I whipped it up earlier this week. I might be sad when it's all gone. Beware, this soup packs a bit of a kick, so if you like spicy, you're in luck!

    p.s. You need a crock pot (slow cooker) for this recipe. If you don't have one you could probably make it stove top simmering for 4 hours or so.

    Chicken Fiesta Soup

    makes 10 servings - prep time: 15 minutes - cook time: 8 hrs

    Ingredients:

    • 4-6 boneless, skinless chicken breasts ( I used 6 because I have a large crock pot and we like lots of chicken)
    • 1 can (14 1/2 ounces) diced tomatoes
    • 2 bottles (28 ounces) enchilada sauce (might find this in a can)
    • 1 1/2 cups low sodium chicken broth
    • 1 cup finely chopped yellow onion
    • 1 teaspoon chopped garlic (2 cloves)
    • 1 teaspoon sea salt
    • 3/4 teaspoon black pepper
    • 1 teaspoon smoked paprika (or cumin)
    • 1 teaspoon cayenne (red) pepper or chili powder
    • 1/4 cup minced fresh cilantro
    • 1 cup frozen whole kernel corn
    • 1 yellow squash, diced
    • 1 zucchini, diced

    Instructions:

    1. Combine all ingredients in crock pot (slow cooker).
    2. Nestle chicken in mixture so that they are covered in the liquid.
    3. Cover and cook on LOW for 8 HOURS.
    4. Remove chicken and place in large bowl. With 2 forks shred the chicken. Put shredded chicken back in to soup and stir to combine well.
    5. Serve with lite Mexican style shredded cheese and/or crushed tortilla chips.

    Notes:

    For more protein and complex carbs, top with Quinoa or brown rice.

    Chicken Sausage and Peppers

    Sausage and Peppers is an old-time family favorite for my fiance. Growing up his mother made this dish with both Chicken and Pork Sausage. Living in Long Island, NY it's not unusual to see Sausage and Peppers on a restaurant menu. That's because it's hearty and delicious with tons of flavor and texture. Not to mention, it's a staple in any Italian diet. I'm not Italian but my Chicken Sausage and Peppers was just as good as the rest and super healthy. I used fresh Spinach and Feta Chicken Sausage from Whole Foods Market and just the basics in terms of seasoning. It turned out better than expected. Served on top of Quinoa and you've got a protein packed, flavor extravaganza in your mouth and your belly.

    Chicken Sausage and Peppers

    makes 4-6 servings - prep time: 10 minutes - cook time: 35 min

    Ingredients:

    • 1 pound Chicken Sausage (any kind you like works well)
    • 3 bell peppers (any color, yellow, green, red, orange) sliced
    • 1 red onion halved and sliced
    • 2 tablespoons Olive Oil
    • 2 cloves chopped garlic
    • 1/2 teaspoon sea salt
    • 1/2 teaspoon black pepper
    • 1 teaspoon dried oregano

    Instructions:

    1. If using fresh chicken sausage, start by browning in a skillet or on the grill. Cook partially or completely so that slicing is easier.
    2. Slice sausage links in to bite size pieces.
    3. Heat Olive Oil in large skillet on medium heat.
    4. Add sausage and cook until brown on all sides, about 2-5 minutes turning over regularly.
    5. Add onions to pan, cook about 1-2 minutes.
    6. Then add seasoning to skillet. Stir well. Add bell peppers, cover and simmer for 20 minutes until peppers are tender.
    7. Serve hot with Quinoa or another grain.


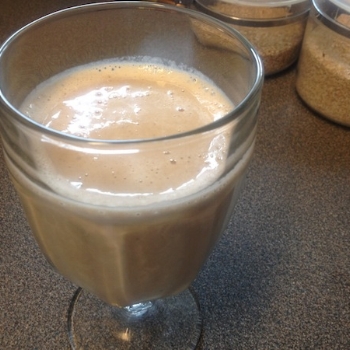
    Creamy Banana Latte Shake

    Perfect for before a workout, this Creamy Banana Latte Shake has the right amount of energy providing carbs and caffeine as well as muscle building protein. For a twist, use chocolate protein powder instead! 

    banana_latte_shake.jpg

    Banana Latte Protein Shake

    makes 1 serving - prep time: 5 minutes - cook time: none

    Ingredients:

    • 1/2 frozen banana
    • 1 scoop vanilla protein powder (I used a whey/casein blend)
    • 1/2 cup cold coffee (I used leftover coffee from breakfast)
    • 4-5 ice cubes
    • 1/4 cup milk or water

    Instructions:

    1. Place all ingredients in blender and blend until smooth.

    Notes:

    For a twist, use chocolate protein powder instead!

      Dr. Pepper Beef Brisket

      I love brisket, but then again, what Jewish girl doesn't? It's hearty and delicious and full of muscle-building protein! I'm always looking for new ways to cook up an old favorite and with my trusty Crock Pot staring me down I just knew I'd have to give it a try. I've seen recipes for Dr. Pepper chicken, but I thought since I have a bottle of Diet Dr. Pepper in my fridge leftover from my party we had over the weekend, I'd use that instead (not to mention it's got zero calories). So here you have it, Diet Dr. Pepper Beef Brisket, slow cooked to perfection and falling apart to the touch. It was so tender that slicing it with a very sharp knife did not fare so well. Let's just say the brisket won. The thing is, when it comes to brisket, the more it falls apart, the better (in my opinion) and this recipe did not fail me. It was juicy and tender and full of beefy flavor. Perfect for a family barbeque or cold winter night. Enjoy!

      beef-brisket_drpepper.jpg

      Dr. Pepper Beef Brisket

      makes 4-6 servings - prep time: 5 minutes - cook time: 10 hrs

      Ingredients:

      • 1 brisket of beef
      • 16 ounces Diet Dr. Pepper
      • 3 cloves minced garlic
      • 1 teaspoon onion powder
      • 1 teaspoon black pepper
      • 2 tablespoons Worcestershire sauce
      • 1/4 cup water (optional)

      Instructions:

      1. Pour all ingredients in to your Crock Pot and mix with spoon.
      2. Settle the brisket in to the liquid.
      3. Cover and cook on low for 9-10 hours or until tender.
      4. Remove and let sit 5-10 minutes before slicing.
      5. Use sharp knife for best results.

      Notes:

      When it comes to brisket, slow and low is always best. Cook 9-10 hours based on the size of your brisket.


      Sliced Apples with Peanut Butter Yogurt Dip

      So I saw something similar to this on Pinterest and I thought I'd give it a go. Forgive me for the iPhone photo, this was literally a photo of my snack yesterday. It was so delicious that I had to share and I was not in the mood to dirty up another bowl and plate for the sake of a colorful more appealing photo. So sue me. Anyway, apples and peanut butter are a staple snack for any healthy fit girl. This recipe for Peanut Butter Yogurt Dip puts a spin on the classic. Be forewarned, I did not measure anything exactly, just kinda took a spoon and eyeballed a good sized serving - enough to dip my entire plate of apple slices in. I will do my best to give you a guesstimate that ends up just as yummy as mine did.

      sliced-apple_PBcinnamondip.jpg

      Peanut Butter Cinnamon Yogurt Dip with Sliced Apples

      makes 1 serving - prep time: 5 minutes - cook time: none

      Ingredients:

      • 1/2 cup plain non-fat greek yogurt (I used Chobani)
      • dash of cinnamon
      • 2 teaspoons crunch peanut butter
      • 1 packet splenda

      Instructions:

      1. Mix all in bowl until combined.
      2. Serve with sliced green apples.